这个系列好久没有写了,但当前既然决定了好好经营这个博客,那么我还是准备继续写下去。
在这一节中,我们主要学习TableView的使用。
对于创建TableView,最重要的几个类是TableView,TableColumn和TableCell。
TableColumn表示是的表格的列,TableCell表示的是表格的一个单元格,我们可以通过Cell Factory来自定义单元格的形式(比如是输入框,文本框,进度条等等)。
下面我们来看看如何创建一个TableView:
import javafx.application.Application;
import javafx.scene.Group;
import javafx.scene.Scene;
import javafx.scene.control.TableColumn;
import javafx.scene.control.TableView;
import javafx.stage.Stage;
public class Main extends Application {
private final TableView table = new TableView();
private final int screenWidth = 300;
private final int screenHeight = 300;
public static void main(String[] args) {
launch(args);
}
@Override
public void start(Stage stage) {
Scene scene = new Scene(new Group());
stage.setTitle("TableView示例");
stage.setWidth(screenWidth);
stage.setHeight(screenHeight);
table.setPrefSize(screenWidth,screenHeight);
//table.setEditable(true);
int colWidth = screenWidth / 3;
TableColumn nameCol = new TableColumn("姓名");
nameCol.setPrefWidth(colWidth);
TableColumn addressCol = new TableColumn("地址");
addressCol.setPrefWidth(colWidth);
TableColumn phoneCol = new TableColumn("电话");
phoneCol.setPrefWidth(colWidth);
table.getColumns().addAll(nameCol, addressCol, phoneCol);
((Group) scene.getRoot()).getChildren().addAll(table);
stage.setScene(scene);
stage.show();
}
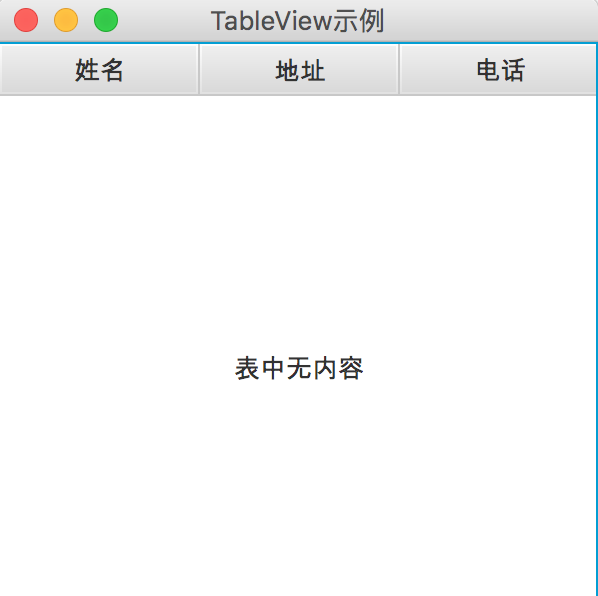
}我们在这里创建了三列,TableColumn,然后设置了列宽,并将TableView添加到根节点下。
运行效果如下:
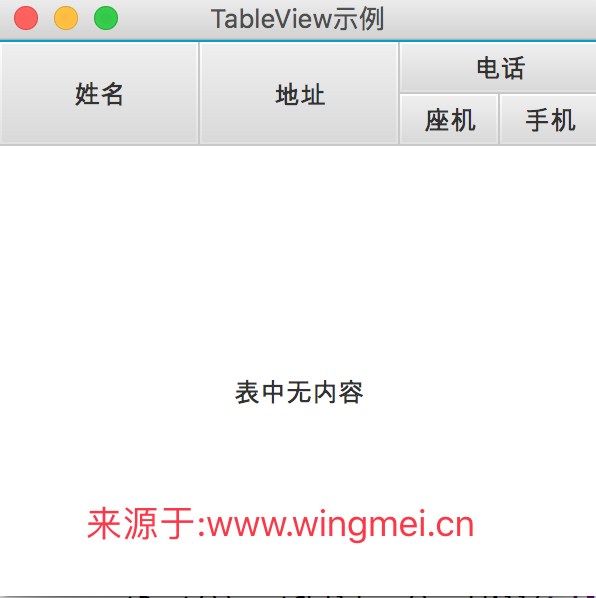
虽然表格创建好了,但如果我们需要对某一大列下面增加子列,也是可以做到的。
如下所示:
       TableColumn phoneCol = new TableColumn("电话");
        TableColumn phone1Col = new TableColumn("座机");
        phone1Col.setPrefWidth(colWidth / 2);
        TableColumn phone2Col = new TableColumn("手机");
        phone2Col.setPrefWidth(colWidth / 2);
        phoneCol.getColumns().addAll(phone1Col,phone2Col);
我们只需要将TableColumn添加到另外一个TableColumn下面即可。
运行效果如下:
既然TableView已经创建好,那么我们来看看如何将数据填充到TableView中。
首先,我们需要创建数据模型,其实就是一个数据类,需要提供set和get方法。
如下所示:
import javafx.beans.property.SimpleStringProperty;

/**
 * Created by wingmei on 2017/4/26.
 */
public class PersonData {
    public SimpleStringProperty mNameProperty = new SimpleStringProperty();
    public SimpleStringProperty mAddressProperty = new SimpleStringProperty();
    public SimpleStringProperty mPhone1Property = new SimpleStringProperty();
    public SimpleStringProperty mPhone2Property = new SimpleStringProperty();

    public PersonData(String name,String address,String phone1,String phone2){
        mNameProperty.set(name);
        mAddressProperty.set(address);
        mPhone1Property.set(phone1);
        mPhone2Property.set(phone2);
    }

    public void setName(String name){
        mNameProperty.set(name);
    }

    public String getName(){
        return mNameProperty.get();
    }

    public void setAddress(String name){
        mAddressProperty.set(name);
    }

    public String getAddress(){
        return mAddressProperty.get();
    }

    public void setPhone1(String mPhone1){
        mPhone1Property.set(mPhone1);
    }

    public String getPhone1(){
        return mPhone1Property.get();
    }

    public void setPhone2(String mPhone2){
        mPhone2Property.set(mPhone2);
    }

    public String getPhone2(){
        return mPhone2Property.get();
    }
}目前我们在JavaFX中的属性一般均采用Property,这样可以方便其他地方的数据绑定使用。
然后我们要使用数据模型来创建我们的数据List:
    private ObservableList dataList = FXCollections.observableArrayList(
            new PersonData("张三","武汉","02711011","12345678"),
            new PersonData("张伟","武汉","02722011","12345678"),
            new PersonData("刘洋","深圳","02715321","12345678")
);然后我们需要将TableColumn与数据关联起来:
       nameCol.setCellValueFactory(new PropertyValueFactory<>("name"));
        addressCol.setCellValueFactory(new PropertyValueFactory<>("address"));
        phone1Col.setCellValueFactory(new PropertyValueFactory<>("phone1"));
phone2Col.setCellValueFactory(new PropertyValueFactory<>("phone2"));最后,将数据填充到TableView中:
table.setItems(dataList);这样就大功告成了,运行效果如下:
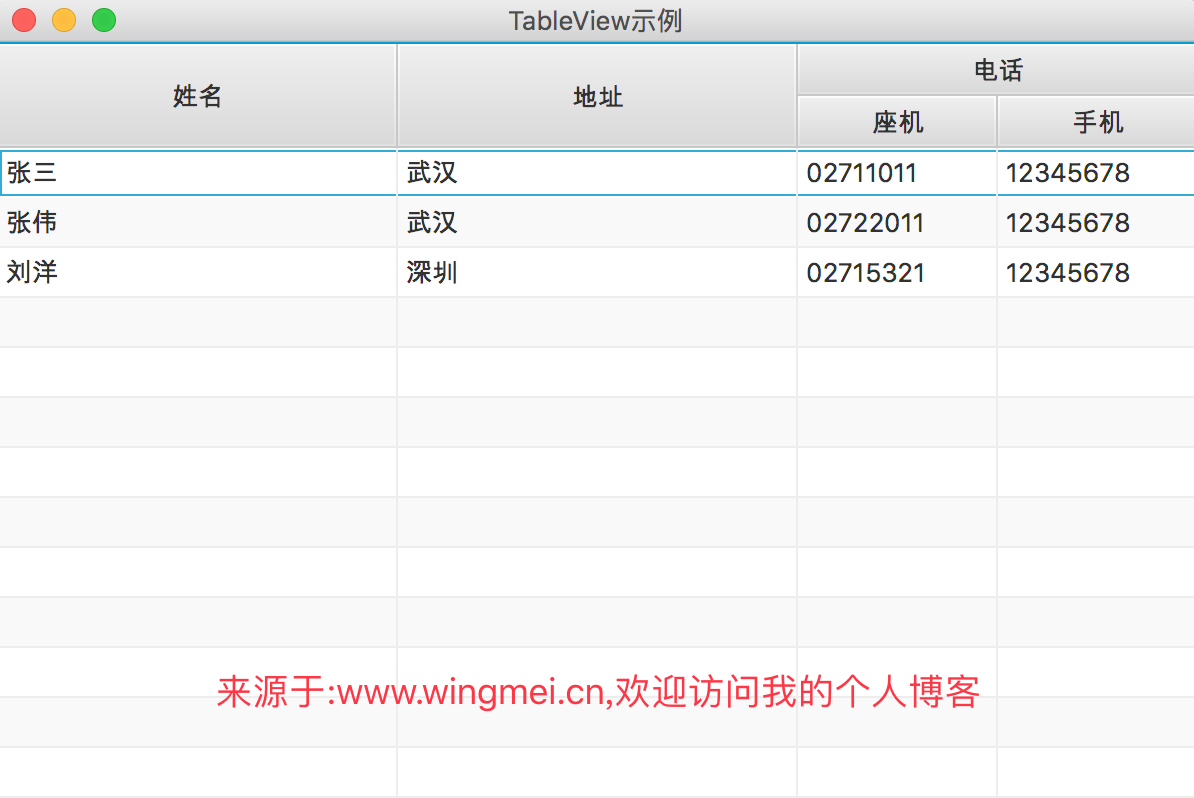
这里为了完整显示数据,我对宽高进行了调整。
那么一般TableView的创建,数据填充等我们已经知晓了,由于TableView的内容较多,我们将分多个部分进行讲解,这一节就到此为止了,下一节再继续。

文章评论
非常感谢你的文章
@匿名