本来准备把所有的控件都写一写,后来觉得没有太大的必要,只准备挑一些重点控件了。
另外JavaFX在Android上打包发布目前都没有什么问题,不过JavaFX游戏在Android上效率一般,毕竟只是Canvas绘图,所以对帧率等要求比较高的游戏还是不建议将JavaFX发布到Android上。
个人最近在写自己简单的游戏引擎的示例,准备不久后开源。
上面是题外话了,现在我们来看看ListView的使用。
1.创建ListView
主要是通过setItems填充ListView的数据,如下:
ListView list = new ListView<>();
ObservableList items =FXCollections.observableArrayList (
    "Single", "Double", "Suite", "Family App");
list.setItems(items);在这里,我们使用了FXColliections来创建填充数据,FXCollections根据文档说明是1:1还原了Collections里面的方法。
然后我们通过下面来设置宽高:
list.setPrefWidth(100);
list.setPrefHeight(70);
显示效果如下:

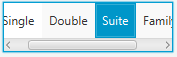
当然,我们也可以设置ListView的显示是横向还是纵向:
list.setOrientation(Orientation.HORIZONTAL)如下图所示:
2.获取ListView的选中物体
在任何时候,我们都可以使用SelectionModel和FocusModel来获取焦点和选中物体。
getSelectionModel().getSelectedIndex() 返回当前选中项的索引
getSelectionModel().getSelectedItem() 返回当前选中项
getFocusModel().getFocusedIndex() 返回当前聚焦项索引
getFocusModel().getFocusedItem() 返回当前聚焦项
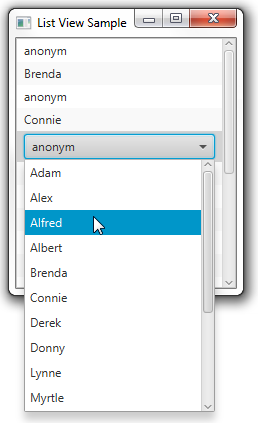
3.用更复杂的方式来填充ListView
在上述示例中,我们只是简单的使用字符串来填充ListView,为了丰富我们的列表,可以使用ListCell来创建更为复杂的ListView项,例如:CheckBoxListCell, ChoiceBoxListCell, ComboBoxListCell,和TextFieldListCell。
下面我们将使用ComboListCell:
import javafx.application.Application;
import javafx.collections.FXCollections;
import javafx.collections.ObservableList;
import javafx.scene.Scene;
import javafx.scene.control.*;
import javafx.scene.control.cell.ComboBoxListCell;
import javafx.scene.layout.StackPane;
import javafx.stage.Stage;

public class ListViewSample extends Application {

    public static final ObservableList names =
        FXCollections.observableArrayList();
    public static final ObservableList data =
        FXCollections.observableArrayList();

    public static void main(String[] args) {
        launch(args);
    }

    @Override
    public void start(Stage primaryStage) {
        primaryStage.setTitle("List View Sample");

        final ListView listView = new ListView(data);
        listView.setPrefSize(200, 250);
        listView.setEditable(true);

        names.addAll(
             "Adam", "Alex", "Alfred", "Albert",
             "Brenda", "Connie", "Derek", "Donny",
             "Lynne", "Myrtle", "Rose", "Rudolph",
             "Tony", "Trudy", "Williams", "Zach"
        );

        for (int i = 0; i < 18; i++) {
            data.add("anonym");
        }

        listView.setItems(data);
        listView.setCellFactory(ComboBoxListCell.forListView(names));

        StackPane root = new StackPane();
        root.getChildren().add(listView);
        primaryStage.setScene(new Scene(root, 200, 250));
        primaryStage.show();
    }
}
通过setCellFactory来设置ListView项的类型。
如下所示:
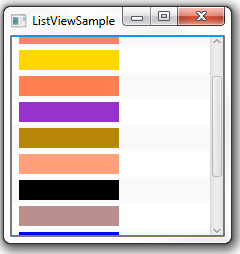
4.自定义ListView的内容
我们可以通过自己继承ListCell,来填充我们自己需要的Item项:
import javafx.application.Application;
import javafx.collections.FXCollections;
import javafx.collections.ObservableList;
import javafx.scene.Scene;
import javafx.scene.control.ListCell;
import javafx.scene.control.ListView;
import javafx.scene.layout.Priority;
import javafx.scene.layout.VBox;
import javafx.scene.paint.Color;
import javafx.scene.shape.Rectangle;
import javafx.stage.Stage;

public class ListViewSample extends Application {

    ListView list = new ListView<>();
    ObservableList data = FXCollections.observableArrayList(
            "chocolate", "salmon", "gold", "coral", "darkorchid",
            "darkgoldenrod", "lightsalmon", "black", "rosybrown", "blue",
            "blueviolet", "brown");

    @Override
    public void start(Stage stage) {
        VBox box = new VBox();
        Scene scene = new Scene(box, 200, 200);
        stage.setScene(scene);
        stage.setTitle("ListViewSample");
        box.getChildren().addAll(list);
        VBox.setVgrow(list, Priority.ALWAYS);

        list.setItems(data);

        list.setCellFactory((ListView l) -> new ColorRectCell());

        stage.show();
    }

    static class ColorRectCell extends ListCell {
        @Override
        public void updateItem(String item, boolean empty) {
            super.updateItem(item, empty);
            Rectangle rect = new Rectangle(100, 20);
            if (item != null) {
                rect.setFill(Color.web(item));
                setGraphic(rect);
            }
        }
    }

    public static void main(String[] args) {
        launch(args);
    }
}
上述我们通过继承了ListCell,在里面填充了颜色矩形,如下图所示:
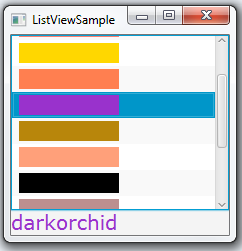
5.执行ListView选中事件
在上述代码中,我们添加如下代码:
final Label label = new Label();
  list.getSelectionModel().selectedItemProperty().addListener(
            (ObservableValue<? extends String> ov, String old_val,
                String new_val) -> {
                    label.setText(new_val);
                    label.setTextFill(Color.web(new_val));
        });
通过对selectedItemProperty的属性监听,来执行选中项事件,如下所示:
那么这一节对ListView的应用就到这里了,其实ListView的应用还有更为复杂的,比如编辑某一项等等,后面若有时间再进行补充讲解吧。

文章评论